landscape designers

When Should You Plant Trees & Shrubs?

Unknown.jpeg

It's True Folks, Fall Is For Planting!

By: Lauren M. Liff for Dabah Landscape Designs

In the world of gardening, there is a huge misconception that the leaves changing color and the temperature dropping signals the end of the growing season. This is false; the growing season doesn’t end until the plants enter their dormant period. What most people don’t know, is that it is actually more beneficial for your trees and shrubs to be planted in the fall as opposed to the spring. Planting your trees and shrubs in the fall gives encourages them to establish a stronger root system before the heat of the next summer.

100032050.jpg.rendition.largest.ss.jpg

Fall technically begins late in September – the best time to plant your trees and shrubs is about six weeks before the first sign of a hard frost. September through November is the perfect time for planting because even though the air is getting cold, the ground is still warm. This allows the root systems to become more established before the dormant period resulting in a stronger and healthier plant for next season. With the cooler temperatures and the increase in precipitation, less watering is required and there is no need to worry about damage from the summer heat. The stable air conditions also allow for rapid root development; rather than focusing all its energy on foliage or flower production, the tree puts its energy into establishing a stronger root system and in storing nutrients for dormancy.

These fall plantings will become better equipped to handle summer heat and drought due to their strongly established root system. From a designer perspective, being able to see a plants fall interest before putting it into the landscape is always a plus. There are some species you should avoid planting in the fall however, broad-leaved evergreens such as rhododendrons, azaleas, boxwoods and hollies require extra care through the winter months. They will need protection from winter winds and should be treated with an anti desiccant. We also recommend that you stick to zone hardy plant material – Schip laurels for example, don’t tolerate winter winds very well at all, the key is to plant them where they can be guarded (for example, as a foundation planting where the house combats the wind).

1452647823537.jpeg

When planting in the fall, there are three things you should keep in mind. Make sure to plant high, the soil will settle leaving your tree or shrub susceptible to root rot or disease. Don’t amend the soil around your new planting – you want to allow the roots of your new tree or shrub to grow into the native soil. With the amended soil, the roots are more likely to experience reduced growth resulting in a smaller root system and a weaker plant. We suggest you break up any clumps in the soil and remove any rocks to allow the root system to travel as it pleases. Make sure to add mulch to your new planting. You can use around 3 inches of mulch or organic matter around your plant. The organic matter should be shredded leaves or ground bark/nuggets. Adding this layer will help protect the root system during the cold weather and allow for better water retention.

If you’re looking to plant a tree this fall, here are some species we recommend: maple, spruce, pine, crabapple, linden, elm, hackberry, hawthorn and honey locust. Planting these trees and shrubs this fall will prove for healthier, happier and hardier plants for the next growing season. Studies show that trees and shrubs planted in the fall, when compared to those planted in the spring, have a more established root system and stronger overall health. A strong root system leads to a strong plant! You should also keep in mind that garden centers and nurseries are trying to clear their stock for the season – who doesn’t love a good discount? 

Happy-gardening.jpg

Chelone lyonii: Lyon’s Turtlehead

DETA-45.jpg

Late Blooming Beauty For Your Fall Garden

By: Lauren M. Liff for Dabah Landscape Designs


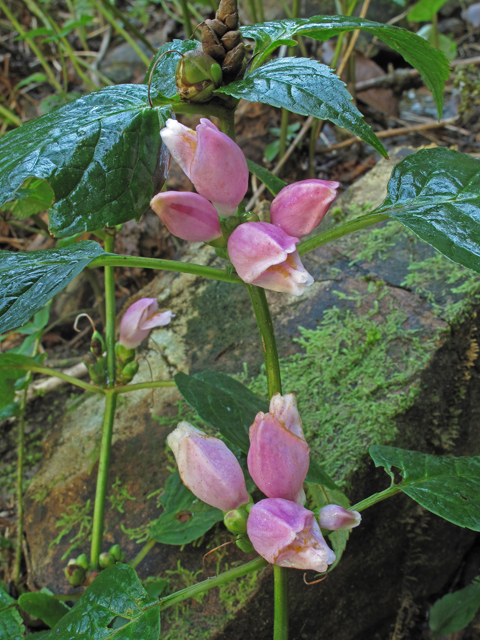
            Chelone lyonii also known as Lyon’s turtlehead or pink turtlehead is a great way to add wonderful color and a unique twist to your garden late in the season. The turtlehead’s name stems from a story in Greek mythology where a nymph (named Chelone) refused to attend the wedding of Zeus and Hera, the gods punished her by turning her into a turtle. However, I’m sure she would be honored to have such an interestingly beautiful flower named after her! The turtlehead adds seasonal interest to your garden with not only its unique blossoms but its thick foliage as well. As the flowers of summer start to fade, this beauty is just getting started.

A_C_IMG0535.JPG

            The turtlehead features rose-pink flowers set on terminal spikes piping out of thick, deep green lustrous foliage. The name “turtlehead” refers to the flowers that slightly resemble a turtle’s head, similar to the hooded flower of the snapdragon. They have pink corollas that have lower lips covered in a slightly yellow beard. The foliage is ovate and coarsely-toothed – the leaves are about 3 to 6 inches long with slender petioles, rounded bases and pointed tips.

It can grow to be 2 to 4 feet tall and is easily groomed to have a bushy habit simply by practicing regular pinching. It can also be kept slightly shorter if you pinch back the stem ends in the spring. Being deer resistant, a pollinator favorite as well as being adored by butterflies, makes the turtlehead a late season perennial favorite. When designing your shade garden, accompany Chelone with Heuchera Americana, Polystichum acrostichoides, Solidago rugosa ‘Fireworks’, Lobelia siphilitica and Conoclinium coelestinum for a true late season combo.

A_C_IMG0537.JPG

            Chelone thrives in moist soil and light shade, however it can become slightly drought tolerant once it’s established. They prefer humusy soils along with well-composted leaf mulch – this will come in handy if you are growing you’re Chelone is growing in a sunnier spot. If you are decide to plant your turtlehead in a full shade area, keep in mind that your plant is more likely to need staking for support due to its build and mature height – however if planted in optimum conditions, staking will not be needed. Chelone spreads by slowly sending out rhizomes that will form large clumps – it is not considered to be invasive but it will self-seed in moist soils. It can be propagated by division, cuttings and by seed.

            Chelone isn’t badly susceptible to most insects or diseases. It can succumb to mildew if it’s grown in soils that are kept mostly dry or if the air circulation in the surrounding area is poor – but when planted in its optimum environment Chelone can be an incredibly successful plant. It makes a great addition to shade and woodland gardens as well as bog gardens or surrounding a shaded pond. It can be used as a border plant and will make a fantastically interesting cut flower. When the weather grows colder and the bright colors of summer being to disappear, Chelone blossoms will pop and bring life back to your late season landscape. 

dsc_0554_2256.jpeg
chelone-lyonii-fl-dkausen.jpg
Turtlehead-mwms1916.jpg

The Moments That Take Your Breath Away

Tigridia lilacea.jpg

Tigridia pavonia: The Tiger Flower

By: Lauren M. Liff for Dabah Landscape Designs


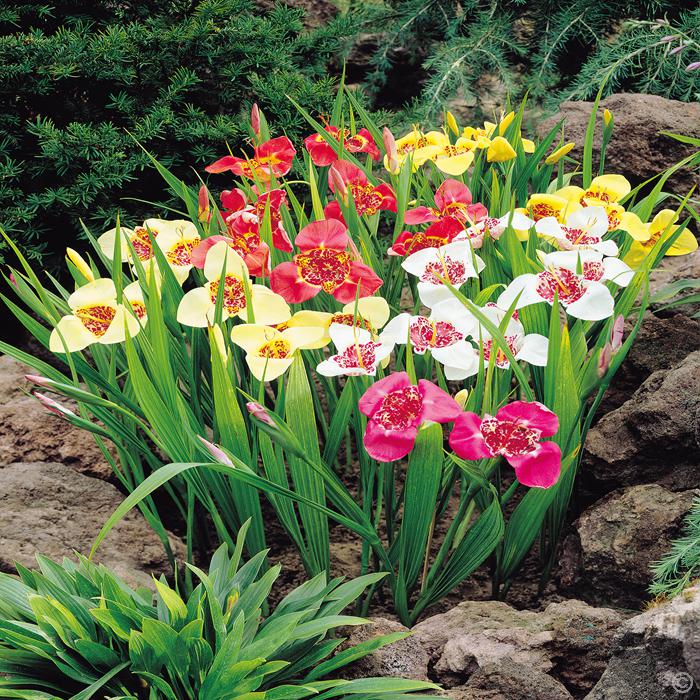
       Have you ever seen something so beautiful that it literally begged you to stop what you were doing and stare in awe? The Tigridia pavonia is one of those breathtaking flowers that you can’t help but stare at. Known more commonly as the Tiger Flower, it truly is a wonder to behold in a late summer garden. With similarities to the Daylily and Gladiolus, the tiger lily comes in a vast range of colors that can make your jaw drop.

       With brightly colored blossoms sitting atop a slender stem, the Tigridia pavonia can produce several flowers per stalk. The flowers are two-toned with combinations of pink, white, red, orchid yellow or orange and a unique contrasting center point. The flowers can be 3 to 6 inches wide and consist of three large one-color petals surrounding 3 small spotted petals. These smaller petals surround a similarly patterned center cup.

FD10488WH.JPG

      The stems are surrounded by sword-shaped leaves that stand upright similar to that of Gladiolus. The interesting characteristic about these delicate blooms is that that they only bloom for a single day. However, since the Tiger Flower produces multiple blossoms per stalk, the flowering period technically can last up to several weeks. You can also cut back the first flowers about six inches down the stem to aid them in re-blooming.

       Tigridia will thrive in areas with well-drained soil and full sun. It has been known to tolerate part shade in a hot climate area. Once established, the Tiger Flower is drought tolerant and deer resistant. It can be used in the landscape as a border or a massing plant; you can also put them in containers as an exotic accent piece. The stems are delicate and the foliage is light so planting it among low-growing plants or groundcovers will work the best.

img_5945.jpg

       The bulbs should be planted in the spring and it’s recommended to plant 3 bulbs to a group for that extra impact. When planting these bulbs, set them 3 inches into the soil and about 5 inches apart – make sure to water well throughout the season. For such an astonishing plant, they are incredibly easy to grow! The bulbs do produce offsets and will eventually form a large clump. You can divide them every 3 years or so to keep them maintained.

       The beauty of this flower is enough to make your heart skip a beat, seeing it in bloom is like falling in love at first sight. For a plant as beautiful as this, its hard to believe that it’s so simple to grow and virtually maintenance free! Turn your already beautiful garden in to a showstopper by planting these bulbs next spring. Your garden will surely be the talk of the town, especially during the end of the season after the early and mid season bloomers have faded – the Tiger Flower is absolutely the diamond in the rough!

mexican-shell-flower1-400x326.jpg
tigridia_grandiflora_b8f44059-c3ec-4868-9978-e875144d0032_1024x.jpg
Tigridia_pav_Sunset_in_Oz.jpg


Organic Hacks To Improve Your Garden

organic-gardening.jpg

Hacks That Will Forever Change How you Garden

By: Lauren M. Liff for Dabah Landscape Designs


Every gardener has their own handful of tips and tricks and by sharing these neat hacks – gardens everywhere are reaping the benefit. There’s the “by the book” way of gardening and then there’s the back road “unorthodox” way. I’ve found that most of these little tricks that work better that the step-by-step instructions from Gardening For Dummies. We’ve selected 5 organic gardening hacks that will not only change the way you garden but better your garden all together:

1. Save your coffee grounds! Believe it or not, coffee is for more than just giving your body a jump-start. Rather than throwing away your coffee grounds, save them for your garden. They are an amazing organic resource and provide nitrogen to your compost as well as assisting in improving your soil structure. If you are adding your grounds to a compost pile, combine it with equal amounts of leaves and grass clippings. When adding coffee grounds to a static compost bin, combine it with a carbon source (such as shredded paper or dry leaves) in equal amounts. For both composting methods make sure to mix the components together for the best results. If you are adding coffee grounds to your soil, make sure the soil is wet and apply a nitrogen fertilizer simultaneously. Coffee grounds in your soil will encourage microorganism growth. It has also been found that coffee grounds in the soil can also repel pests such as snails and slugs while at the same time attracting earthworms.

Egg-Shells-Soil-PLant.jpg.838x0_q80.jpg

2.  Save your eggshells! If you place crushed eggshells around your garden plants and vegetables, this will help deter slugs and will take your plants off their lunch menu! There really is no science behind this little hack; it’s simply that slugs do not like sharp edges as their soft bodies could easily be punctured. If you notice the obvious slime trails on your vegetative materials, its time to break out the eggshells (pun intended)!

3.  Epsom salt for your tomatoes. Epsom salt has multiple health and beauty benefits for us, but who knew that it could be useful in the garden? Epsom salt is actually a naturally occurring mix of sulfate and magnesium. So when adding Epsom salt, in small quantities, to your tomatoes, can actually help the plant develop better fruit! Magnesium and sulfate are important ingredients when it comes to plant growth. It has also been found that adding Epsom salt around stressed plants can actually help them to recover.

stem-cutworm.jpg

4.  Aluminum foil comes in handy! Every gardener is concerned about crawling pests when it comes to their vegetable gardens. Simply wrap a collar of aluminum foil around your tomatoes or squash – this will help deter these pests and prevent them from tasting your vegies before you even get the chance. Again, there is no science behind this hack; most crawling insects are not fond of moving across metal surfaces. The foil also acts as a physical barrier, preventing stem-harming pests such as borers from attacking your plants.

5. Baking soda is a multipurpose product! Baking soda can also be used in the garden as an organic fix for fungal diseases. The sodium bicarbonate properties in baking soda actually act as a natural fungicide. All you need to do is take 1 teaspoon of baking soda and dissolve it in 4 cups of water, add a few drops of liquid dish soap (so the solution can stick to the plants). Spray this solution on plants to prevent fungal diseases like powdery mildew, rust and black spot. This method can be repeated ever week to two weeks (or after rainfall).

There are so many garden hacks out there that can make your gardening experience easier and your garden happier. These hacks are heard mostly by word of mouth, so if you have any hacks of your own, please share them on our Facebook. We can all benefit from anything and everything that will make our lives better and easier. Happy gardening!

More Garden Hacks

Are You a Good Weed? Or a Bad Weed?

plantain-.jpg

Soil Conditions: Weeds as Indicators

By: Lauren M. Liff for Dabah Landscape Designs


When it comes down to it, any gardener will tell you that there is no such thing as a good weed, and I’m inclined to agree with them. However, the weeds that love to invade your property can actually tell you a lot about your garden. Analyzing the types of weeds that flourish throughout your property can clue you in on the soil conditions of your lawn and garden spaces. With this knowledge, you can make the proper soil amendments and provide a better growing environment for your garden plants as well as your turf.

Improving your soil conditions often can help deter or even eliminate weed growth and when it comes to weed control, taking preventative measures will provide the best results! It makes sense that soil conditions and weed growth go hand in hand. Although there are a vast number of types of weeds as well as a wide range of soil types, we are going to focus on the weeds that are most “popular” and the most common soil types. Let’s see which weeds will help you decipher what soil conditions you have in your lawn and garden.


For wet, moist and poorly drained soils:

- Moss Joe-pye weed

- Spotted spurge

- Knotweed

- Chickweed

- Crabgrass

- Ground ivy

- Violets Sedge 

For soil that is dry sandy:

- Sorrel

- Thistle

- Speedwell

- Garlic mustard

- Sandbur

- Yarrow

- Nettle

- Carpetweed

- Pigweed 

For soil that is hard and compacted:

- Bluegrass

- Chickweed

- Goosegrass

- Knotweed

- Mustard

- Morning glory

- Dandelion

- Nettle

- Plantain 

For heavy clay soils:

- Plantain

- Nettle

- Quack grass 

For Acidic soils:

- Oxeye daisy

- Plantain

- Knotweed

- Sorrel

- Moss 

For alkaline soils:

- Queen Anne’s lace (wild carrot)

- Chickweed

- Spotted spurge

- Chicory 

For Poor/low fertility soils:

- Yarrow

- Oxeye daisy

- Queen Anne’s lace (wild carrot)

- Mullein

- Ragweed

- Fennel

- Thistle

- Plantain

- Mugwort

- Dandelion

- Crabgrass

- Clover

For fertile, well-drained, humus soils:

- Foxtail

- Chicory

- Horehound

- Dandelion

- Purslane

- Lambsquarters 

7caef1e5fef6e0177cc148e8bbfc76a7--gardening-tips-weed.jpg

Perrenial-garden.jpg

It’s easy to identify common weeds using the link listed below or by using research books. Once you are able to identify the weeds that plague your property, you can eradicate these pests and improve your soil. Not only are you improving the growing environment for your turf and plant material, you are improving the over all look of your property. As much as I dislike saying it, there is no true way to win the battle against these weeds. However, these preventative measures and your consistent devotion to your outdoor space will help to lessen their ability to take up space on your property and lessen the competition they bring against your chosen plant material.

Rutgers Weed Gallery


Source

Guide To Working With The Right Landscape Designer: Part 3

Top 4 Questions To Ask About Your New Landscape

By: Lauren M. Liff for Dabah Landscape Designs


Congratulations on your newly installed landscape! You asked the right questions before hiring your landscape designer and you asked the right questions during the project but now that the project has been completed, what’s next? Every landscape design client has questions regarding their new plant material and hardscapes. We believe that there is no such thing as a silly question, so ask away! As landscape designers, we want to see your new design flourish for years to come.  Here are the top questions we recommend you ask regarding your new outdoor space:

Top: Initial Installation, Bottom: 1 year later

Top: Initial Installation, Bottom: 1 year later

1. How long will it take for the garden to fill in? When a new garden is installed, the plant material used seems to look small but there is a reason for that. Designers take into account the mature size of the plant and plan for the space it needs to grow. Each plant has a different growth rate, some ornamental grasses and perennials can grow in within a single season but larger woody material such as trees and shrubs can take some time to fill in. We can say that the year following your landscape installation will absolutely look more incredible than it did when it was first installed. Be sure to ask your designer how long they believe it will take for the areas in your landscape to grow in, that way you will have an estimated timeline.

unnamed.jpg

2. How much maintenance do my new plants require? Different plants require different levels of maintenance and maintenance depends on how much time you are willing to commit to your garden. Some companies offer maintenance services which are at your disposal and if they do not offer those services, you can ask for recommendations. For “the do it yourselfers” make sure to ask about the maintenance requirements for the plant materials used on your property. Proper maintenance and care results in happy, healthy and well-established plants.

unnamed.gif

3. When and how often should I water my new plants? Similar to maintenance practices, watering routines vary from plant to plant. Some like wet feet, others prefer dry soil and some are in between. Request the watering requirements for your plant materials from your designer – this will help to ensure their success going forward. If you do not have an irrigation system, ask if they would recommend having one installed or for suggestions on alternative watering methods. Make sure to ask how often you should water – typically the best time to water your garden and turf is early in the morning and around dusk. New plants do require more water as opposed to plants that are already established.

unnamed-1.jpg

4. How do I handle weeds in my new garden? Weeds are an incredibly common problem in every garden and they can take away from the beauty of the design. You can ask your designer for recommendations on how to control them. From our standpoint, preventative measures work the best – there are pre-emergent weed control applications that you can apply in your garden (organic as well). Although it seems like a lot of work, pulling weeds out as they appear will help to keep your garden in top shape.


Working through a landscape design and installation process can be difficult…but it doesn’t have to be. When it comes down to it, asking the right questions at the right times will make all the difference! Using our simple to follow 3 part guide will absolutely make your project go smoothly and your experience much more relaxing and enjoyable. Being on the same page as your designer, not holding in any questions you might have and gaining knowledge about your landscape will help you to keep your garden in tip top shape for many years to come! 


http://www.foxnews.com/real-estate/2017/04/07/10-questions-to-ask-before-hiring-landscape-designer.html

DIY Family Garden Project

Kokedama Hanging Garden For Kids (And Adults!)

By: Lauren M. Liff for Dabah Landscape Designs


With the technology kids have access to nowadays, it’s hard to get them away from anything with a screen. So why not let them have a fun learning experience while fostering their creative side and gain quality family time all at once? Try this fun DIY garden project on for size! This project isn’t just fun for the children, but adults can enjoy it as well! Kokedama hanging gardens are fun to make and very easy to care for, so it is perfect for your children (and yourself!). Kokedama means: “moss ball” in Japanese. It is essentially a way to garden by covering the roots with moss and soil and more moss, and then a string is added to hang it up.

For this project you will need:

•   Small, shade-tolerant plant (baby ferns work the best)

•   Scissors

•   Peat soil

•   Bonsai soil

•   Mixing pot

•   Water

•   Garden gloves

•   ½ cup measure

•   Yarn or twine

•   Moss, collected from outside or purchased at a garden center

Here we go!

Step 1: Remove the dirt from the plant by tapping it gently. You want to have the plant so that it is mostly the plant head and its roots (as little soil as possible).

3951ffbf0499de3d_0052-w618-h409-b0-p0--tropical.jpg

Step 2: Mix the two soil types together – 3 ½ cups of peat soil and 1 ½ cup of bonsai soil. Add ½ cup of water to dampen the soil mixture

Step 3: Put on your garden gloves (or don’t if you don’t mind getting a bit dirty!) and shape the soil mixture into a ball – similar to rolling dough. More water can be added (a small amount at a time) if needed to get the soil mixture to stay in a ball shape. Make sure the ball is big enough for the plant roots to fit inside.

4e10c7d495ee16666b25914cee0b1310--bonsai-garden-moss-garden.jpg

Step 4: Take some of your moss and wrap a small amount around the bare roots of your plant (this will help your plant retain moisture)

Step 5: Poke a hole in the soil ball big enough to fit the plant roots in, while maintaining the ball shape of the soil

Step 6: Insert the plant roots into the hole and mold the soil ball around them (again still maintaining the ball shape)

Step 7: Wrap the outside of the soil ball with the remaining moss

Step 8: Take your twine or yarn and wrap it around the ball several times to help keep the moss in place – make sure you leave some yarn or twine above the ball in order to hang it up

Step 9: Take your beautiful new kokedama hanging garden and hang it in a shady place for everyone to enjoy – to keep it healthy simply mist it!


http://kidsactivitiesblog.com/28869/kokedama-hanging-garden-for-kids

Guide To Working With The Right Landscape Designer: Part 2

Top 4 Questions To Ask About Your Landscape Design Project

By: Lauren M. Liff for Dabah Landscape Designs

         You’ve hired a landscape designer and you're bursting with excitement as images of picturesque gardens float through your mind. The anticipation of the beauty of your completed project builds, but then your mind starts to wander. What if something goes wrong? You asked the right questions before hiring your landscape designer, but what’s next? If you’ve never worked with a landscape designer before, you want to make sure the right questions are raised during your project. Here are the top questions to ask once you’ve hired your landscape designer, before the first shovel hits the ground:

1. What are your ideas for our design? Once you have discussed your “wish list” with your designer, and they have had a chance to take a look at the property, you want to find out what their ideas are for your garden. Designers can present their designs to you in a number of ways: a collage-style mood board with pictures of plants and other features, a two-dimensional/to-scale drawing created with a CAD program, a 3D rendering or a hand drawn to-scale blueprint of the design. When the design is presented to you, make sure everything on your wish list is depicted and voice your opinion throughout the design project.

backyard.jpg

2. What is the estimated cost of our project? Finding out the estimated cost of your project is key when it comes to your budget. Since you’ve set a budget before beginning this phase of the project, you know how much you are willing to spend. Be sure to ask for the estimated cost of the design as well as the installation. You also want to ask how changes to the project during the installation will be handled – these are called “add ons”. It is important to know how add-ons will effect the total cost of the project as designed changes do often arise during the installation.

3. What can we do to reduce the cost? Hardscape installations such as pathways, patios, decks and retaining walls are typically more expensive than softscape installations (plant material). So sufficed to say, the more hardscapes in the design the more costly the project will be. Materials used for hardscape installations vary greatly for the product as well as the installation – be sure to discuss with your designer ways to reduce the cost of the project to stay within your budget. Designers will be able to provide you with options that can save you money without losing any of the creativity of the design.

4. How long will it take for the project to be completed? The time it takes for a project to go from the design phase to the installation phase and then to completion varies on a number of factors. The size and scope of the job, acquiring the necessary materials and plants, weather and other set backs all play a part in how long the project will take to be completed. There is no way to guarantee an exact completion date due to these factors, but you can ask the designer for an estimated date range for when the installation will be finished. Remember, quality designs and installations take careful planning and time. Patience is key in this process.

         Keeping these questions in mind throughout the design process will allow you to be sure-footed in your decision. You always want to be on the same page as your landscape designer to avoid miscommunications that could lead to errors in the installation process. When it comes to making sure that the professional design is what you had envisioned for your property, you want to keep an open line of communication between yourself and the designer. Asking these questions will allow you to do just that, as well as allow for a smooth design phase and an easy transition into the installation phase. 


Source

.sqs-block-content h1 { font-size: 80px !important; }