DIY Family Garden Project

Kokedama Hanging Garden For Kids (And Adults!)

By: Lauren M. Liff for Dabah Landscape Designs


With the technology kids have access to nowadays, it’s hard to get them away from anything with a screen. So why not let them have a fun learning experience while fostering their creative side and gain quality family time all at once? Try this fun DIY garden project on for size! This project isn’t just fun for the children, but adults can enjoy it as well! Kokedama hanging gardens are fun to make and very easy to care for, so it is perfect for your children (and yourself!). Kokedama means: “moss ball” in Japanese. It is essentially a way to garden by covering the roots with moss and soil and more moss, and then a string is added to hang it up.

For this project you will need:

•   Small, shade-tolerant plant (baby ferns work the best)

•   Scissors

•   Peat soil

•   Bonsai soil

•   Mixing pot

•   Water

•   Garden gloves

•   ½ cup measure

•   Yarn or twine

•   Moss, collected from outside or purchased at a garden center

Here we go!

Step 1: Remove the dirt from the plant by tapping it gently. You want to have the plant so that it is mostly the plant head and its roots (as little soil as possible).

3951ffbf0499de3d_0052-w618-h409-b0-p0--tropical.jpg

Step 2: Mix the two soil types together – 3 ½ cups of peat soil and 1 ½ cup of bonsai soil. Add ½ cup of water to dampen the soil mixture

Step 3: Put on your garden gloves (or don’t if you don’t mind getting a bit dirty!) and shape the soil mixture into a ball – similar to rolling dough. More water can be added (a small amount at a time) if needed to get the soil mixture to stay in a ball shape. Make sure the ball is big enough for the plant roots to fit inside.

4e10c7d495ee16666b25914cee0b1310--bonsai-garden-moss-garden.jpg

Step 4: Take some of your moss and wrap a small amount around the bare roots of your plant (this will help your plant retain moisture)

Step 5: Poke a hole in the soil ball big enough to fit the plant roots in, while maintaining the ball shape of the soil

Step 6: Insert the plant roots into the hole and mold the soil ball around them (again still maintaining the ball shape)

Step 7: Wrap the outside of the soil ball with the remaining moss

Step 8: Take your twine or yarn and wrap it around the ball several times to help keep the moss in place – make sure you leave some yarn or twine above the ball in order to hang it up

Step 9: Take your beautiful new kokedama hanging garden and hang it in a shady place for everyone to enjoy – to keep it healthy simply mist it!


http://kidsactivitiesblog.com/28869/kokedama-hanging-garden-for-kids

The True Cottage Garden Heartthrob

Dicentra eximia: The Fern-leaf Bleeding Heart

By: Lauren M. Liff for Dabah Landscape Designs


            In almost every cottage style garden you see, there is one breathtaking plant that rules over all others: the fern-leaf bleeding heart. A true shade garden staple, this stunning perennial offers beautiful blooms almost all summer long unlike its cousin Dicentra spectabilis. The fern-leaf bleeding heart tends to stay on the dwarf side and rarely grows more than 15 inches in height. It will bloom all summer long without going dormant and it comes in a range of foliage and bloom color, providing gardeners everywhere with many options for the shady spots in their landscape.

447756387922893615.jpg

            A North American native, the fern-leaf bleeding heart has been used by breeders to develop a number of different varieties that come in a wide range of colors from the cherry red flowers of the ‘Luxuriant’ to the pure white flowers of the ‘Snowdrift’. The ‘Bacchanal’ variety offers the deepest red bloom of them all and is adorned with foliage that is almost a silver-blue shade. All varieties are low lying and slow spreading and require little to no maintenance all season long. Dicentra eximia features hearth shaped flowers hanging from long arched stems slightly resembling the look of a dangling bouquet. These incredibly recognizable blooms sit atop finely cut foliage that is typically a blue-green shade.

            The fern-leaf bleeding heart can tolerate very cold winters and don’t tend to be too picky when it comes to soil type, however they do thrive in moist, fertile soil. They can be planted in the sun however they do best in a part to full shade area. Too much shade will lessen the number of flowers. When planting your bleeding heart, avoid placing it where it will be in competition with tree roots – lack of water and available nutrients will greatly shorten its lifespan. To keep it as healthy and happy as possible, it should be divided every 3 or 4 years in early spring and the soil should be amended with organic matter (compost will work the best). Once it is established, the fern-leaf bleeding heart is disease and insect resistant and will flower continuously from spring to fall year after year without needing to be deadheaded or pruned.

            Thanks to its dwarf habit, the fern-leaf bleeding heart is perfect as a front border plant in a shady garden. You can also use it in a shade-rock garden or woodland garden along the rocks. Its beautiful foliage makes it perfect as an edging plant as well. The blue-green color of the leaves contrast beautifully with the purple-red leaves of Heuchera or the gold leaves of the Hosta variety ‘Daybreak’. You can also plant it along side Hakonechloa as well as many fern varieties. The fern-leaf bleeding heart in combination with these companion plants will give your shade garden an incredible range of colors and textures to provide you with season long interest.

 
dicentrakingofhearts_jwb_1_lg_0.jpg
BH205-2.jpg
621722eb4bf7d4ded7ffe184bf1b02a7--bleeding-heart-flower-bleeding-hearts.jpg

Guide To Working With The Right Landscape Designer: Part 2

Top 4 Questions To Ask About Your Landscape Design Project

By: Lauren M. Liff for Dabah Landscape Designs

         You’ve hired a landscape designer and you're bursting with excitement as images of picturesque gardens float through your mind. The anticipation of the beauty of your completed project builds, but then your mind starts to wander. What if something goes wrong? You asked the right questions before hiring your landscape designer, but what’s next? If you’ve never worked with a landscape designer before, you want to make sure the right questions are raised during your project. Here are the top questions to ask once you’ve hired your landscape designer, before the first shovel hits the ground:

1. What are your ideas for our design? Once you have discussed your “wish list” with your designer, and they have had a chance to take a look at the property, you want to find out what their ideas are for your garden. Designers can present their designs to you in a number of ways: a collage-style mood board with pictures of plants and other features, a two-dimensional/to-scale drawing created with a CAD program, a 3D rendering or a hand drawn to-scale blueprint of the design. When the design is presented to you, make sure everything on your wish list is depicted and voice your opinion throughout the design project.

backyard.jpg

2. What is the estimated cost of our project? Finding out the estimated cost of your project is key when it comes to your budget. Since you’ve set a budget before beginning this phase of the project, you know how much you are willing to spend. Be sure to ask for the estimated cost of the design as well as the installation. You also want to ask how changes to the project during the installation will be handled – these are called “add ons”. It is important to know how add-ons will effect the total cost of the project as designed changes do often arise during the installation.

3. What can we do to reduce the cost? Hardscape installations such as pathways, patios, decks and retaining walls are typically more expensive than softscape installations (plant material). So sufficed to say, the more hardscapes in the design the more costly the project will be. Materials used for hardscape installations vary greatly for the product as well as the installation – be sure to discuss with your designer ways to reduce the cost of the project to stay within your budget. Designers will be able to provide you with options that can save you money without losing any of the creativity of the design.

4. How long will it take for the project to be completed? The time it takes for a project to go from the design phase to the installation phase and then to completion varies on a number of factors. The size and scope of the job, acquiring the necessary materials and plants, weather and other set backs all play a part in how long the project will take to be completed. There is no way to guarantee an exact completion date due to these factors, but you can ask the designer for an estimated date range for when the installation will be finished. Remember, quality designs and installations take careful planning and time. Patience is key in this process.

         Keeping these questions in mind throughout the design process will allow you to be sure-footed in your decision. You always want to be on the same page as your landscape designer to avoid miscommunications that could lead to errors in the installation process. When it comes to making sure that the professional design is what you had envisioned for your property, you want to keep an open line of communication between yourself and the designer. Asking these questions will allow you to do just that, as well as allow for a smooth design phase and an easy transition into the installation phase. 


Source

Are Plants Ticklish?

True or False: Tickling your plants can help them grow

By: Lauren M. Liff for Dabah Landscape Designs


Almost everyone is ticklish, some people enjoy being tickled while others can’t stand it – but the truth is, that it does nothing but make us laugh. Did you know that you could tickle plants to help them grow? They won’t laugh uncontrollably right away, but their enjoyment is still just as noticeable over time. Many commercial greenhouses and nurseries tickle, stroke or repeatedly bend their plants – now, this might seem crazy at first but they are actually tapping into a natural phenomenon that impacts how plants grow. This practice of tickling and bending plants is known as thigmomorphogenesis.

Plants respond to a number of different stimuli – light, gravity, moisture levels and yes, even touch. Thigmomorphogenesis is a plants’ response to being touched. This natural process occurs when a plant is touched by any outside influence including rain, wind and passing animals. The growth rate and habit of a plant varies based on what touches it most often. For example, a tree growing in a very windy spot will change its growth habit to gain more mechanical strength. This tree will be short and have a strong thick trunk – it might also form a wind-swept shape. The tree grows this way in order to avoid being blown over in a storm.

Climbing vines are another perfect example: quite opposite to the wind-swept tree, vines will grow towards the objects that touch them. This is why vines climb up our houses, fences and mailboxes. By alternating the growth rate on each side of the stem, vines are able to traverse in almost any direction. For example: if you stroke a cucumber tendril on the same side over and over again, it will inevitably bend in the direction of the touch.

Now, you might be asking yourself why one would bother tickling a plant? Funny thing is, it can actually help your plants grow stronger! Seedlings that are grown inside tend to fall victim to etiolation. Etiolation means an excessively tall and spindly growth habit – or “leggy” as most people call it. This happens even more when they don’t get enough sunlight. When you touch, tickle or gently bend your seedlings, you are actually helping to stimulate growth. Placing a fan by your seedlings will also aid your seedlings in growing stronger – the blowing of the fan will mimic outdoor wind.

Obviously you want to provide your plants with the essentials. To ensure proper growth, always make sure to provide your seedlings and other plant material with adequate water and light. For seedlings grown indoors, you should avoid excessive nitrogen fertilizations to help prevent etiolation.  Tickling your plants, although it does sound quite silly, can prove to be an incredibly interesting experiment. With the proper care of your plants and seedlings plus some daily tickle time, you’ll end up with healthy, strong and very happy plants. Happy growing!

Attention S’mores Lovers: What you Need To Know About Fire Pits

What to Consider When Planning A Fire Pit

By: Lauren M. Liff for Dabah Landscape Designs


The definition of an outdoor space is changing drastically as the years pass; it has gotten to a point where simply having a deck and a grill just won’t cut it. Backyards everywhere are becoming much more detailed and full of “accessories”. From outdoor kitchens to outdoor living rooms complete with fireplaces and detailed stonework designed to look like elegant area rugs. As backyards everywhere are being transformed, the number one fixture being implemented into almost every outdoor design is the fire pit. If you are thinking about adding a fire pit to your outdoor space, here are several things to keep in mind:

1. What is your budget? When planning the design of your fire pit, you want to keep your budget in mind. Fire pits can be all different shapes and sizes and can be made of a variety of materials; the cost of a fire pit can range anywhere from $200.00 and up. If you are building a small fire pit, you can buy the stones and dig the hole yourself or buy a simple fire pit unit from a retailer to keep the cost low. The cost can obviously get increasingly high depending on the sophistication of your fire pit.

2. Will it be permanent or portable? Are you looking for a fire pit that will become the focal point in your yard or do you want to be able to bring the fire pit along with you to a gathering? For a built-in design, the materials should match either your home or other materials in your garden so that everything can flow together smoothly. Portable fire pits come in a wide variety of materials and shapes. There are fire bowls, fire tables and also chimney-style options as well. Whatever style you chose, make sure to use to proper stones and materials for your fire pit to work safely. 

3. Will it use wood or gas? Wood and gas are the most common choices for fueling a fire pit. If you are looking for that all too familiar true fire pit smell, then wood is the way to go – just make sure your fire pit has a screen. If you don’t care if you have that smell or not, or you want a quick starter, you can go with gas or propane. Some of these fire pits have remote start capabilities. The fire from a gas-fueled pit won’t be as hot as a wood fire; you also won’t hear the crackling or get that smoke that comes from a wood fire.

4. Where will it be placed? When placing a portable fire pit, it is best to use it on a natural surface – concrete, stone, grave, or brick (for example) will work fine. Embers could fly from your fire pit and could start a fire if not placed on the proper surface. Permanent fire pits are typically built on a gravel base. The fire pit should be built so that it is proportional to the size of your yard and will allow for seating and proper air circulation. In terms of its location in the yard, most areas have a requirement that the fire pit must be at least 10 feet from the home and neighbors’ yards. Permits are sometimes needed for larger fire pits and some require a site inspection to make sure that the location is safe for a fire pit. Before building your fire pit make sure to check your local ordinances to see what is required.

Whether you decide to build your fire pit with a premade kit from a local retailer or you opt to have a landscape professional design and install it, it’s always important to plan thoroughly before beginning the installation process. When it comes to your fire pit, you want to think “safety” above all else.

Safety Tips:

1. Check wind direction before lighting a fire

2. Don’t use flammable fluids to light/relight fires

3. Don’t ware flammable clothing (nylon) or anything loose-fitting

4. Avoid using soft woods (pine/cedar) – they can “pop” and throw sparks

5. Keep children and pets at least 3 feet away from the fire

Float Like A Butterfly, Sting Like A Bee, Smell Like A Buddleia

Buddleia davidii: The Butterfly Bush

By: Lauren M. Liff for Dabah Landscape Designs


            If butterfly gardens were like kingdoms, the butterfly bush would be the king. Buddleia davidii or, the butterfly bush, as it is more commonly known, is a must-have in any butterfly garden – when it comes to attracting butterflies, it can’t be bested. This beautiful deciduous shrub explodes with blossoms in the late summer and continues blooming into the fall (depending on the weather of course). The butterfly bush is incredibly easy to grow and needs little in the way of maintenance making it the obvious choice for all gardeners from novice to professional.

            Butterfly bushes can grow to be 6 to 12 feet in height with a spread from 4 to 15 feet. These tall shrubs are known for their beautiful long panicles of colorful blossoms. The flowers come in a wide variety of colors included two-tone varieties, however it seems to be the lavender/pink blooms that butterflies enjoy the best. The blossoms provide nectar for many species of adult butterflies, as the leaves are a food source for the larvae of some species. The butterfly bush will thrive when planted in full or part sun and in well-drained soil; planting it in a location that provides these conditions will lessen the amount of maintenance it will require. Keep in mind that the more sun it gets, the more blooms it will have!

            In terms of maintenance, Buddleia does not need a lot of fertilizer – too much fertilizer will promote for foliage growth and lessen flower production. It requires moderate watering and once established it can become drought tolerant – it does not like to have wet feet, too much water will cause root rot. Flowers can be cut so you can enjoy their fragrance in your home and spent blooms can be removed during the growing season to promote additional flowering. The butterfly bush is considered to be slightly invasive so to keep your Buddleia in check, be sure to remove the seed heads in October and prune annually in the spring. Some species can flower on old wood and should only be pruned to maintain its shape and remove dead branches.

            Most of the beautiful flowering plants I see at the nursery and would love to have in my yard are candy for deer – but not the butterfly bush, this beauty is deer resistant! The deer will only dine on Buddleia as an absolute last resort. Butterfly bushes are also not known to have frequent run-ins with diseases or insects either. If the plant is in an environment that doesn’t meet its growth needs, it will become stressed and open to spider mites. Sometimes, but not often, the butterfly bush can be attacked by Japanese beetles, weevils and caterpillars.

            The flowers of the butterfly bush give off a wonderfully soothing fragrance – plant it near a window or patio so you can enjoy its sent throughout the summer months. Aside from being a regular in every butterfly garden, Buddleia can be planted as a back border in a perennial garden, as a massing plant and some dwarf varieties can be used as a front border or an edging plant.  The butterfly bush is also surprisingly tolerant of urban pollution so they can successfully be used in city landscapes as well as along roadsides. Not only are butterfly bushes incredibly attractive on their own, but covered in butterflies outside your window with their fragrance filling the air? That sounds like absolute bliss to me!


https://www.plantdelights.com/blogs/articles/butterfly-bush-buddleia-davidii-plant-buddleja

Guide To Working With The Right Landscape Designer: Part 1

Top 4 Questions To Ask Before Hiring A Landscape Designer

By: Lauren M. Liff for Dabah Landscape Design


         Transforming your property into a beautiful work of art can be an incredibly exciting endeavor and even more so if the entire process goes smoothly. When making the decision to hire a landscape designer you want to make sure you avoid any surprises that may pop up mid-project as much as possible. To avoid such instances, you want to raise the right questions prior to beginning and throughout the duration of your project. Before you even begin your search for a landscape designer, you want to make sure you know what you are looking to have done. It helps to walk around your property and write down a “wish list” so to speak, of projects you would like to have completed. Make a list of projects you yourself would like to complete and which projects you would prefer to have a professional do. Writing out your thoughts and ideas will help give you a clear sense of what you want to have done before speaking to a professional. Once you’ve found landscape designers that you would like to contact, asking the following 4 questions will make sure that you end up hiring the right person for the job.

59531_435118452082_3048215_n.jpg

1. What services do you offer? You want to make sure that the landscape designer you are thinking of hiring can provide you with the services you are looking for. Landscape designers fall into one of three categories: design only, design-build and full service design-build-maintain. Knowing what services a company offers will help you chose the one that is best suited for your project.

2. Can I see examples of your past work? If you are looking for your property to have a certain style, you want to make sure that the landscape designer has worked on other projects with that same style. You want to hire someone who can bring your dream landscape to life and have it be everything you envisioned and more.

3. Is work done in house or is it subcontracted out? It’s always good to find out who is actually going to be completing the project. Some landscape designers use subcontractors for certain aspects of the job such as hardscape installation or carpentry features. It’s best to work with a company who will be in control of every phase of the job – if the landscape designer uses a subcontractor, if that person has a problem it could throw off the entire job.

landscape+design+master+plan.jpeg

4. What is your process? A landscape designer’s process will depend on what services the company offers. Understanding the process of completing your project will allow you to know what to expect throughout the duration of your job. You also want to be honest with the designer about your budget – setting a budget up front is incredibly important because it will tell the designer not that they need to spend the entire budget, but what they can accomplish within the set budget.


         You want to find a landscape designer who can help you to bring your landscape vision to life – someone who can complete the job within your budget without skimping on the creativity. Asking these questions first will give you that leg up on your project and better prepare you for the entire process. A well-designed and maintained landscape can increase your property value by at least 20%. With an investment like that, you absolutely want to be sure you are getting your dream landscape from a design professional who will provide you with exceptional service from start to finish.


Guide to working with the right landscape designer: Part 2


Source

Using Soda In The Garden

coca cola who knew wednesday.png

Share a Coke With Your...Garden?

By: Lauren M. Liff for Dabah Landscape Designs

         Coca Cola is one of, if not the most, popular carbonated beverage of our time. Most people enjoy Coke as a sugary carbonated soda but that is not all it could be used for! Coca Cola actually has a multitude of uses due to its sugar content and low pH level. It can be used as a cleaner for your spark plugs, car engine, toilets and tiles – it can clean up old coins and jewelry as well. It has also been used to relieve the pain associated with a jellyfish sting! With all of these different uses for this hallmark soda pop, could it possibly have any use in the Garden?

         Originally, Coca Cola was derived to cure a Confederate colonel of his ailing addiction to morphine that began after he was wounded during the Civil War. He was initially seeking an alternative pain reliever and his searching led to the invention of Coca Cola. Now, since Coke was originally being used as a health tonic, you might be asking, “what possible use could it have in our gardens?” It turns out that Coke can actually be used to kill slugs! Some gardeners use beer while others use poison, but Coca Cola will work just as well.

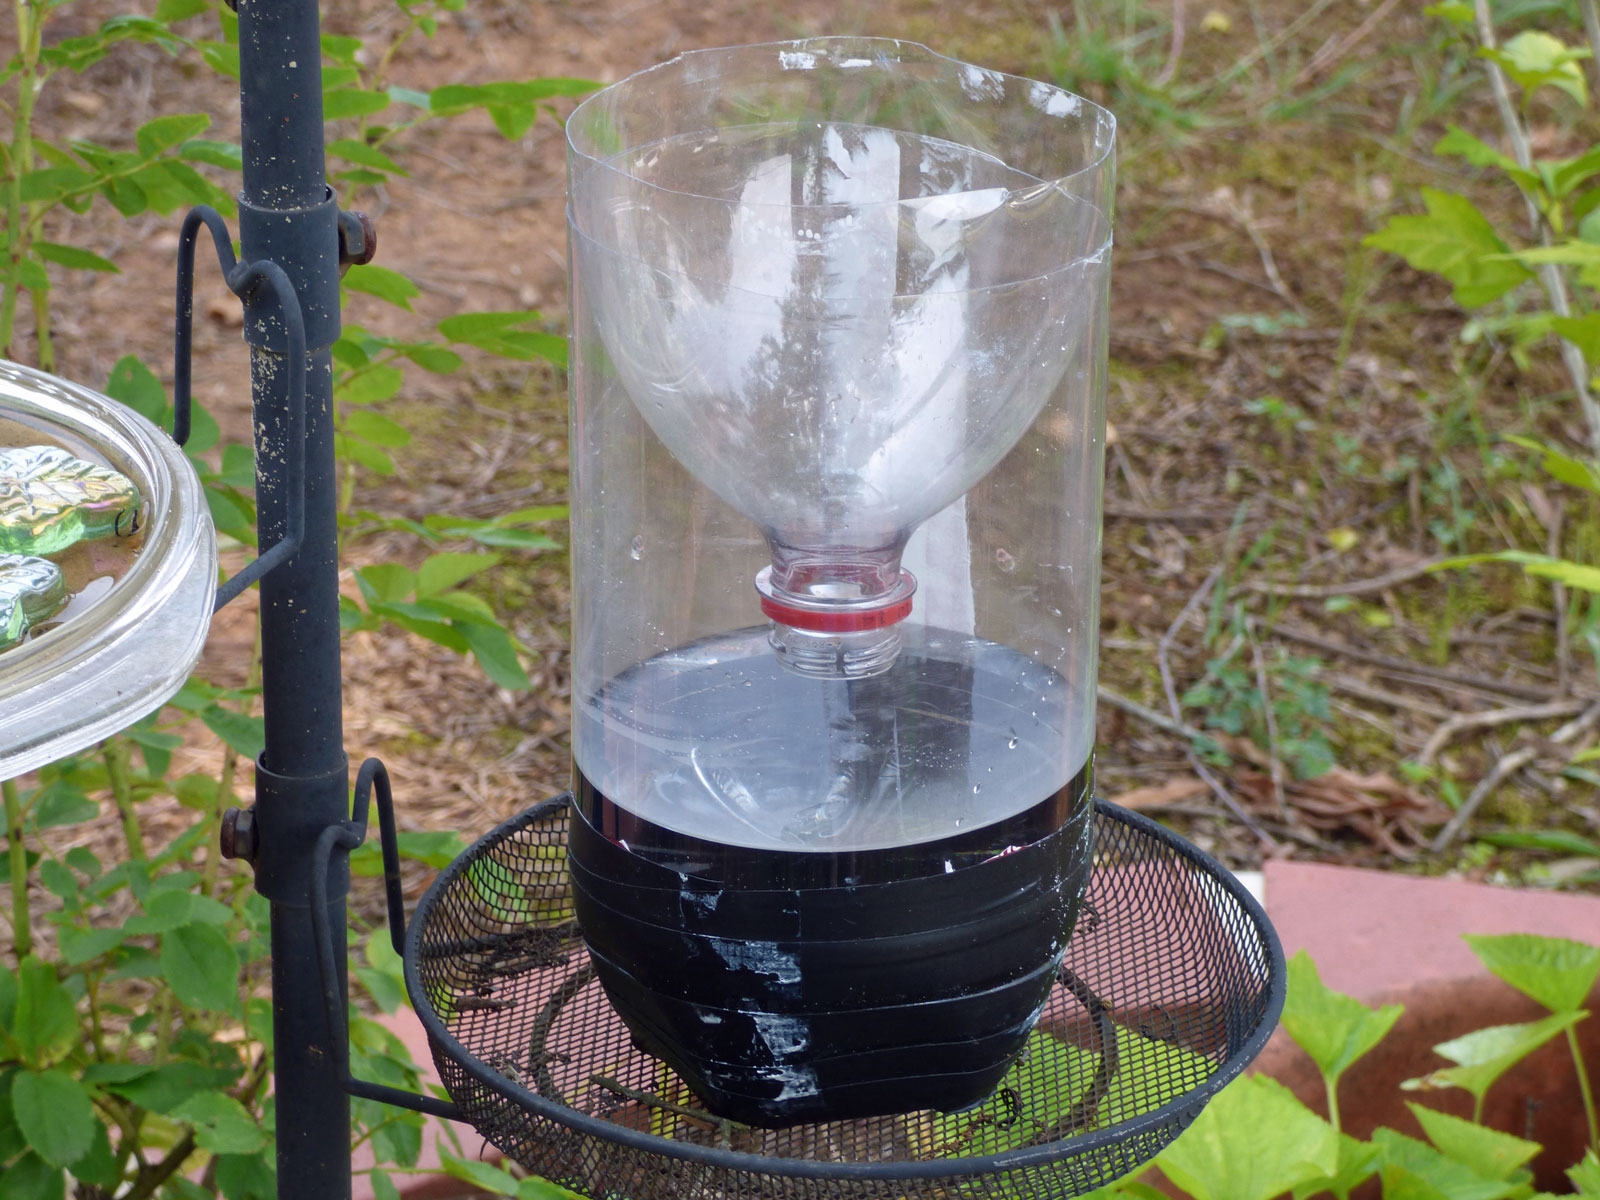
wasp-trap.jpg

         Slugs start devouring your garden in the spring before most other insects are even close to causing their own damage. The suspect is easily identified as slugs leave behind a trail of silvery slime wherever they go. They feed on the foliage of your plants; they chew ragged holes into the leaves and can sometimes devour an entire seedling. To use the Coca Cola method to control slugs in your garden, simply fill a low bowl or cup with Coca Cola and leave it in you garden overnight. Just like using beer, the slugs will be attracted to the sugar in the soda and lure them into the bowl. The slugs will then find their way into the sugary drink and suffer a death comparable to drowning in acid. This method works on wasps as well; the homemade wasp trap is similar to your slug trap, you could use a low bowl filled with the soda or even an open can or bottle of Coke will do. The wasps are also attracted to the sugar and travel into the container and drown. Coca Cola can also be sprayed on insects (such as cockroaches and ants) as a pesticide.

         If that wasn't enough, Coke can also be used in composting! Again, thanks to the high sugar content of the soda, it attracts the microorganisms that aid in jump-starting the break down process. The acids in the beverage also aid in the breaking down of compost. Pouring Coca Cola into the soil around your acid-loving plants is also said to reduce the pH level due to the acids in the beverage. So not only can you drink this enjoyable soda pop on a hot summer day, you can use it in your house, in your car and in your garden as well! With its nuisance pest control capabilities and its positive addition into your compost, your garden can enjoy this delightful drink as much as you do!


https://www.gardeningknowhow.com/garden-how-to/info/uses-for-coke-in-gardens.htm

.sqs-block-content h1 { font-size: 80px !important; }